
1Flow supports Push Notification Announcements, enabling you to trigger actions with push notifications.
Implementation Push Notifications
Set up a Firebase Cloud Messaging client app on Android - Setup the push notifications.
Register Your App for a Device Token
Follow these steps to register your app for announcement push notifications and to retrieve a device token.
Setup OneFlow Push Notifications with Firebase
If your app uses Firebase for push notifications, ensure there's no conflict with OneFlow:
- Pass the push token obtained from Firebase to OneFlow:
javaOneFlow.setPushToken("token");
- Handle incoming notifications and pass them to OneFlow for processing:
java@Override
public void onMessageReceived(RemoteMessage remoteMessage) {
    if (remoteMessage.getData().size() > 0) {
       try {
            JSONObject json = new JSONObject(remoteMessage.getData());
            OneFlow.receivedNotification(json.toString());
       } catch (Exception e) {
            Log.e(TAG, "Exception: " + e.getMessage());
       }
    }
 }
- Handle events for notification taps and pass them to OneFlow for processing:
javaJSONObject json = new JSONObject();
json.put("announcement_id","1234");
json.put("link","https://www.google.com");
OneFlow.didTapNotification(json.toString());
- Finally, modify your FirebaseMessagingService file code as follows:
javapublic class MyFirebaseMessagingService extends FirebaseMessagingService {

    private static final String TAG = "MyFirebaseMsgService";

   @Override
		public void onMessageReceived(RemoteMessage remoteMessage) {
		    if (remoteMessage.getData().size() > 0) {
		       try {
		            JSONObject json = new JSONObject(remoteMessage.getData());
		            notificationContentHandler(json, remoteMessage);
		            OneFlow.receivedNotification(json.toString());
		       } catch (Exception e) {
		            Log.e(TAG, "Exception: " + e.getMessage());
		       }
		    }
    }

    private void notificationContentHandler(JSONObject json, RemoteMessage remoteMessage) {
		    String imageUrl = "";
		    String title = "";
		    String messageBody = "";
        try {
             imageUrl = json.optString("icon");
        } catch (Exception e) {
            e.printStackTrace();
        }

        if (remoteMessage.getNotification() != null) {
            messageBody = remoteMessage.getNotification().getBody();
            title = remoteMessage.getNotification().getTitle();
        }

        sendNotification(title, messageBody, imageUrl);
    }

    private void sendNotification(String title, String messageBody, String imageUrl) {

        Bitmap bitmap = getBitmapFromURL(imageUrl);

        NotificationCompat.BigPictureStyle bigPictureStyle =
        new NotificationCompat.BigPictureStyle();

        bigPictureStyle.setBigContentTitle(title);
        bigPictureStyle.setSummaryText(Html.fromHtml(messageBody).toString());
        bigPictureStyle.bigPicture(bitmap);

        Intent intent = new Intent(this, MainActivity.class);
        intent.addFlags(Intent.FLAG_ACTIVITY_CLEAR_TOP);
        PendingIntent pendingIntent = PendingIntent.getActivity(this, 0 , intent,
        PendingIntent.FLAG_IMMUTABLE);

        String channelId = getString(R.string.default_notification_channel_id);
        Uri defaultSoundUri =
        RingtoneManager.getDefaultUri(RingtoneManager.TYPE_NOTIFICATION);
        NotificationCompat.Builder notificationBuilder =
                new NotificationCompat.Builder(this, channelId)
                        .setSmallIcon(R.drawable.ic_stat_ic_notification)
                        .setContentTitle(getString(R.string.fcm_message))
                        .setContentText(messageBody)
                        .setAutoCancel(true)
                        .setSound(defaultSoundUri)
                        .setStyle(bigPictureStyle)
		                    .setLargeIcon(bitmap)
                        .setContentIntent(pendingIntent);

        NotificationManager notificationManager =
                (NotificationManager) getSystemService(Context.NOTIFICATION_SERVICE);

        // Since android Oreo notification channel is needed.
        if (Build.VERSION.SDK_INT >= Build.VERSION_CODES.O) {
            NotificationChannel channel = new NotificationChannel(channelId,
                    "Channel human readable title",
                    NotificationManager.IMPORTANCE_DEFAULT);
            notificationManager.createNotificationChannel(channel);
        }

        notificationManager.notify(0 /* ID of notification */, notificationBuilder.build());
    }


    public Bitmap getBitmapFromURL(String strURL) {
     try {
       URL url = new URL(strURL);
       HttpURLConnection connection = (HttpURLConnection) url.openConnection();
       connection.setDoInput(true);
       connection.connect();
       InputStream input = connection.getInputStream();
       Bitmap myBitmap = BitmapFactory.decodeStream(input);
       return myBitmap;
     } catch (IOException e) {
         e.printStackTrace();
         return null;
     }
   }
}
- The first parameter represents the ID of the notification. Users can pass a unique ID here to manage and group notifications effectively.
javanotificationManager.notify(0 /* ID of notification */, notificationBuilder.build());
Ensure these steps are integrated correctly into your project based on whether you're supporting an additional sender or using Firebase alongside OneFlow for push notifications.
Dashboard Configuration and Testing for Push Notifications
Navigate to your 1Flow dashboard:
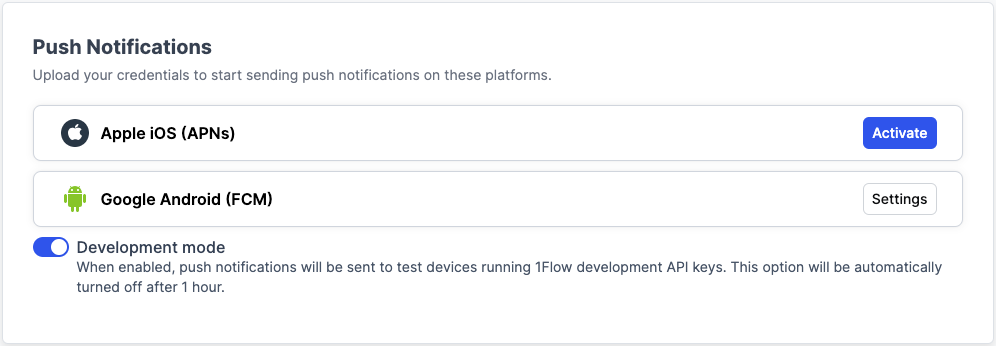
- Go to Settings → Project → Push Notifications.
- Activate Google Android (FCM) .
- Fill required details and save.
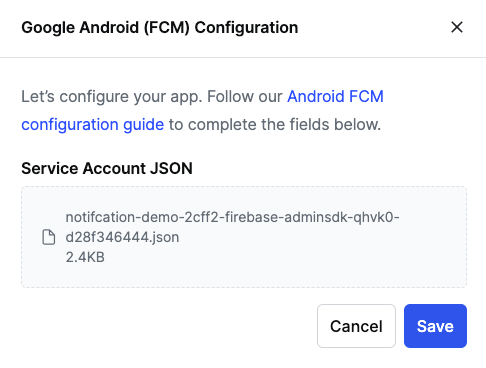
To generate a private key file for your service account:
1. In the Firebase console, open Settings > Service Accounts.
2. Click Generate New Private Key, then confirm by clicking Generate Key.
3. Securely store the JSON file containing the key.
Test Push Notifications in Production
To test push notifications, you will need an Android device. Follow these steps:
- Open the application on your Android device.
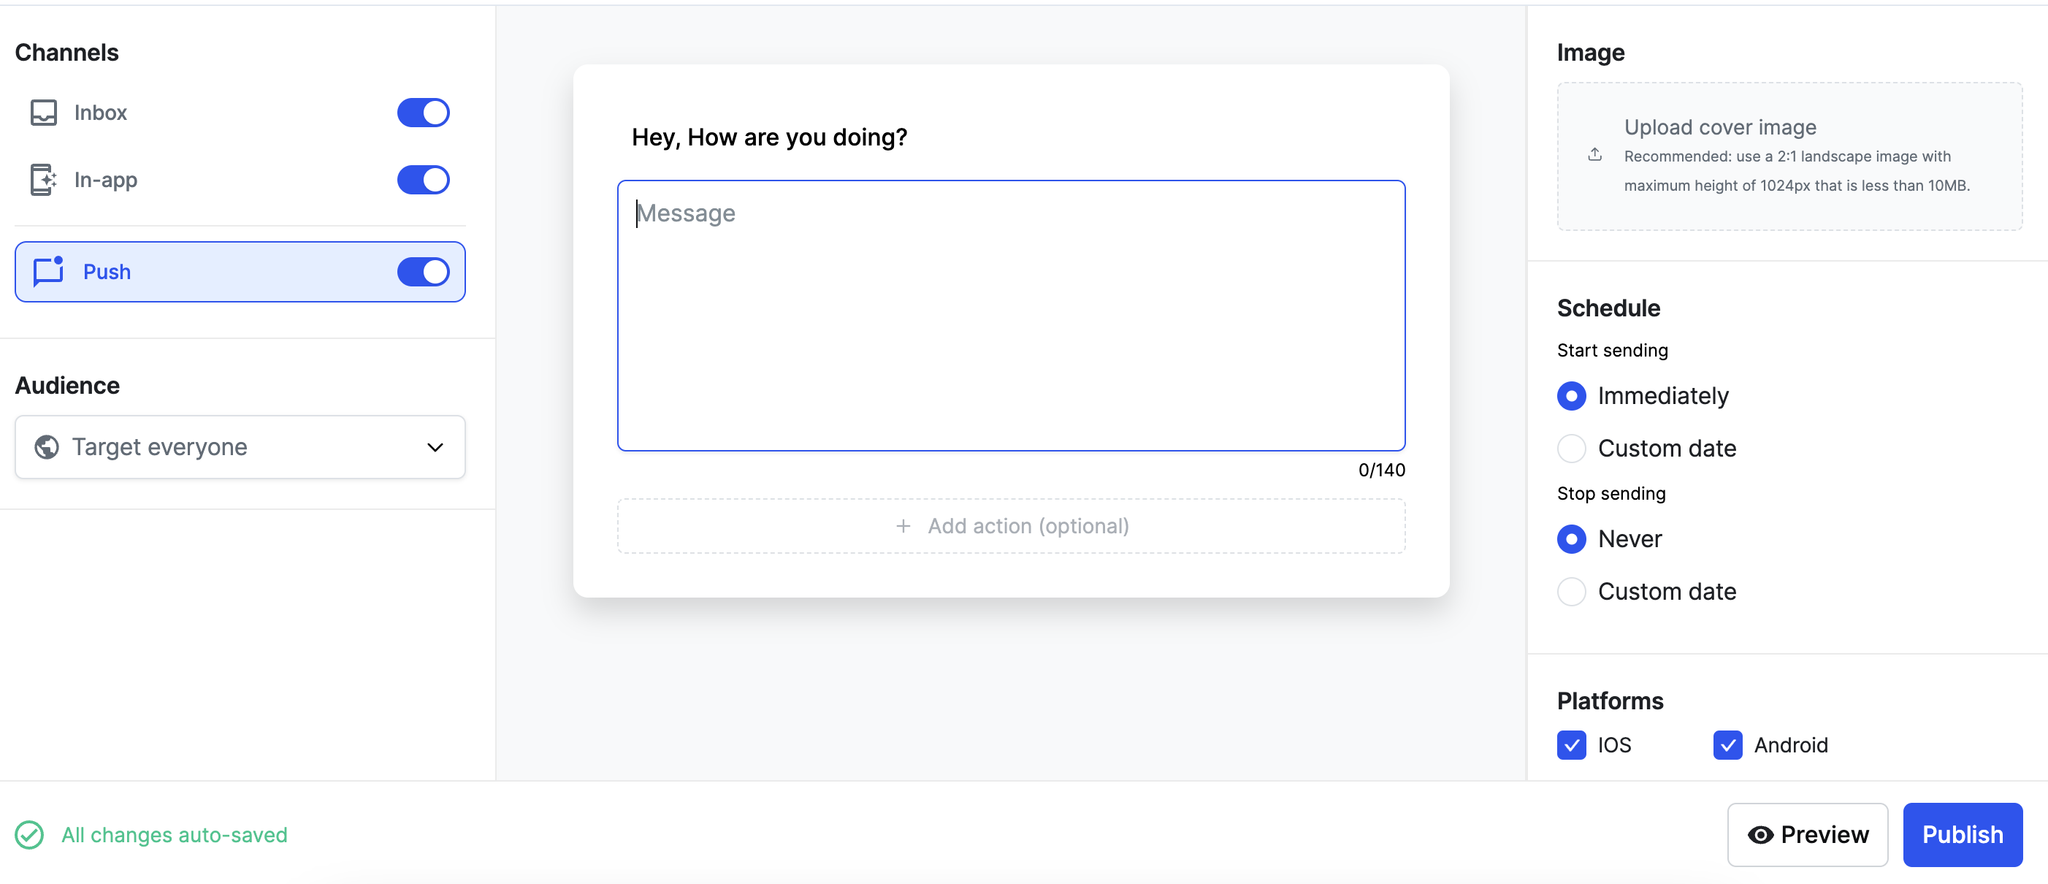
- Navigate to the 1Flow dashboard and create a new announcement.
- Select "Push" from the Channel list.
- Fill in the required details and click "Publish."
Please note that it may take up to 5 minutes for the notification to be delivered.
Test Push Notification
For testing purposes, use the development API key. Remember to switch to the production API key before uploading your app to the PlayStore.
- Enable Development Mode in the 1Flow dashboard: Go to Settings → Project → Push Notifications, and turn ON Development Mode. This mode automatically disables after 1 hour.
- Create a new API key for Development: Navigate to Settings → Project → API keys, and click "New API key". Name it appropriately and select "Development" as the type.
When configuring the OneFlow SDK for sandbox testing, use your development API key as follows:
javaOneFlow.configure(context, "your-development-api-key");
Before submitting your app to the PlayStore, ensure you switch to the production API key in your code.